Hi.
If you managed to read and (hopefully!) understand my introductory blog post about MaxScript here then it’s time to start doing useful things with MaxScript, things with geometry.
Yep, modelling stuff.
This is going to be a really long blog post though, as there is a lot to get through…
If you would prefer to have this emailed to you in PDF format, please feel free to enter your details below, and I’ll be happy to send it over –
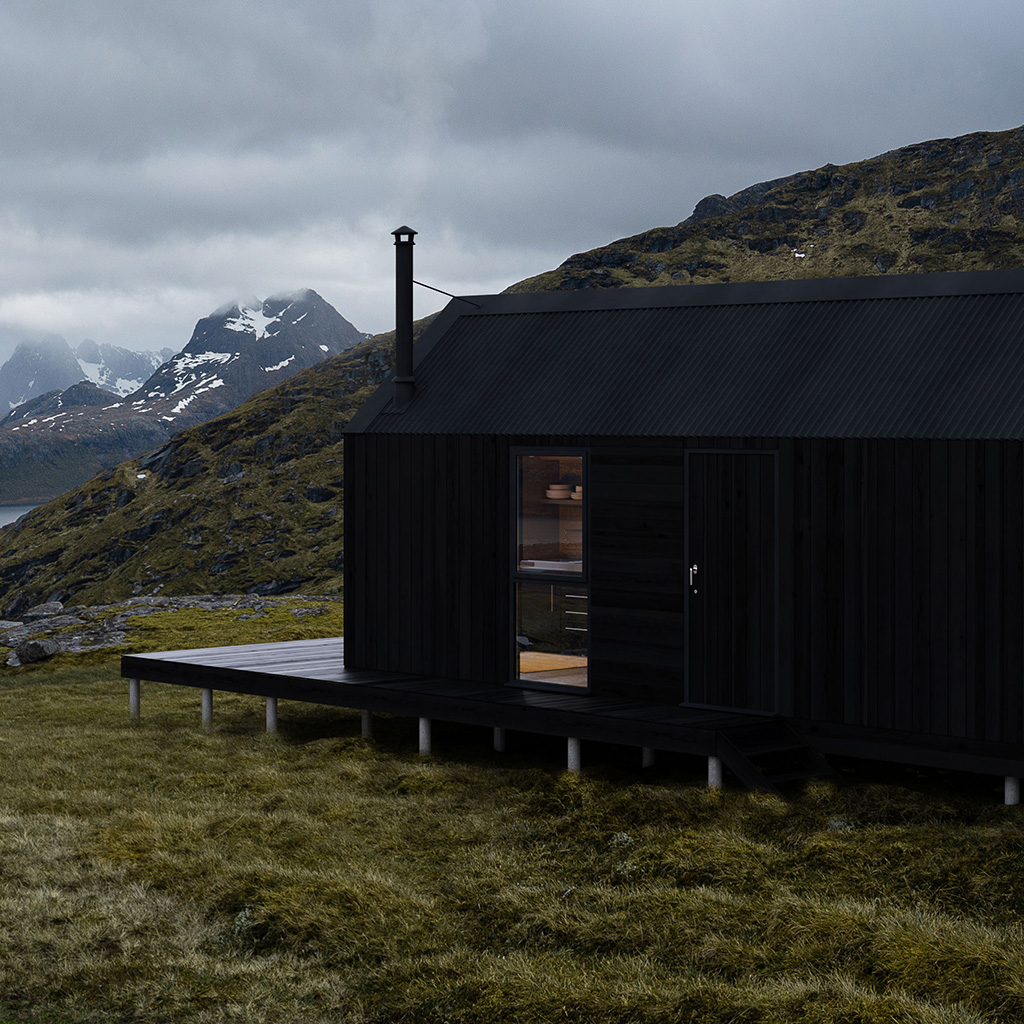
Retina produces a lot of images of cabins. These cabins are mostly clad in timber, but oftentimes the ‘setting out’ of the cladding (I call each individual timber cladding piece ‘slats’) hasn’t been derived yet. That’s ok, our job is to make a compelling illustration of the initial cabin design, but of course to do that, we need to model something that looks like timber cladding.
You could of course find a nice material, a group of bitmap textures, diffuse or albedo map, something for the glossiness, normal, bump, displacement maps, all good stuff.
Personally though, I think geometry beats bitmaps with regard to photorealism in ArchViz (or CabinViz if you like..)
So what’s the process? How do you model a timber clad cabin, and where do you start?
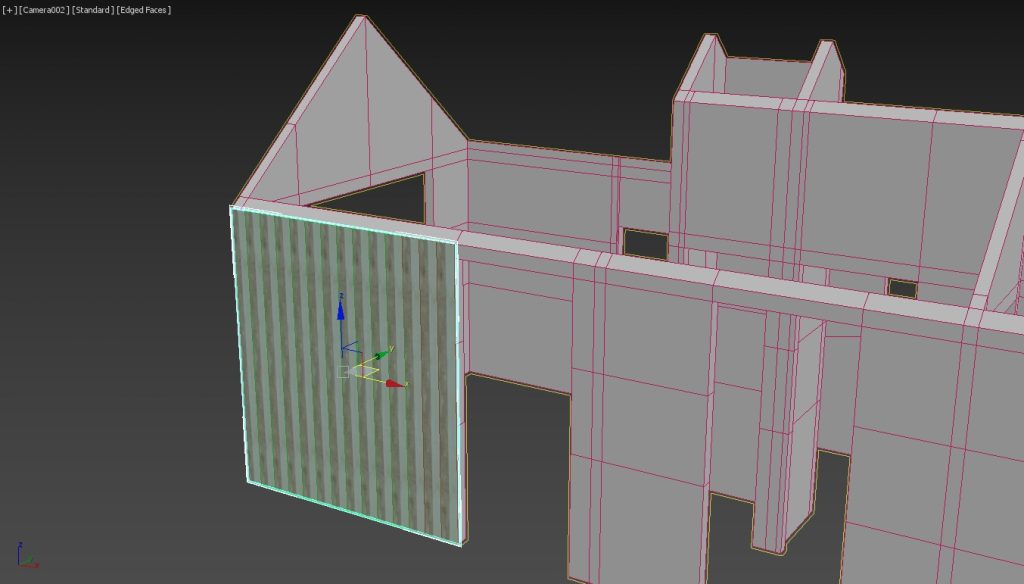
Ordinarily, I’ll start by building the internal sub-structure. The stuff behind the cladding. I won’t make every element of this structure, more a simple shell using simple poly-modelling techniques. Easier to show an image of the end result, rather than try and explain this verbally –
This has the internal lining (which could be plaster, plywood, OSB boarding, flock wallpaper if you’re fancy) and also the external lining upon which the waterproofing layer and cladding slats will be fixed to.
Why mention the waterproofing layer? Well, this is actually what I’ll use to generate the cladding slats, if I model this in a certain way.
Remember that MaxScript can interact with 3ds Max scene objects and find / modify (‘get and set’) their various attributes, if you use the $ symbol together with the object’s name, or if selected, typing $selection.
$box001.height
Typing this into the MaxScript listener will have it report back with box001’s current height, (using your current 3ds Max system units and if you have a box in your scene called ‘box001’ obviously..)
for i in $selection do (print i.name)
This will make the MaxScript listener reel off the names of everything currently selected.
So far so good.
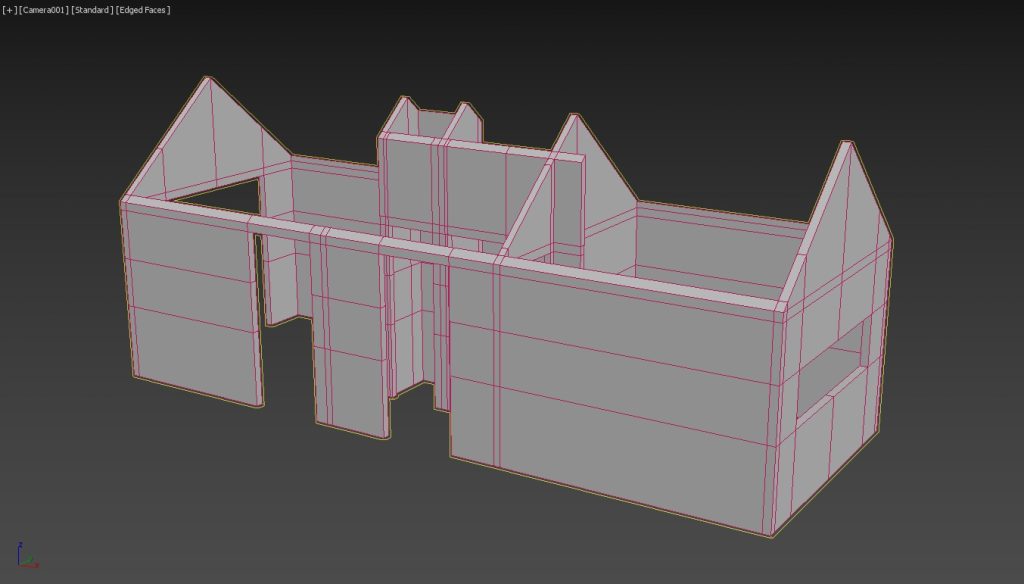
Going back to the waterproofing layer, how and why am I going to model this?
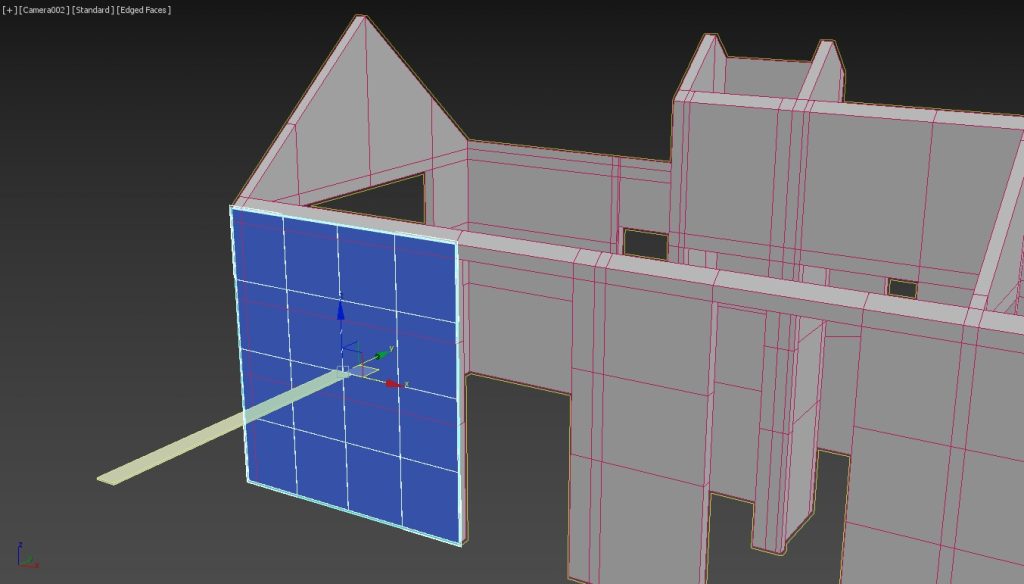
Well, I’m going to add a series of plane objects, snapping in 3D to the vertices of my existing shell, taking advantage of the handy ‘autogrid’ feature in 3ds Max, making it easier to do this in a 3D or perspective view. I won’t collapse these planes into an editable mesh or poly. I’ll make a plane for each area of cladding, going from bottom corners to top corners, under and over window openings too.
Woah! That was a paragraph and a half!
Again, it’s easier to show an image than again, try and explain it verbally.
Why am I doing this? Well, what attributes does a plane have? Length and width.
(Bear in mind it will lose these if I collapse it to an editable poly or mesh).
Great. So what?
Well, for a bunch of vertical cladding slats, the plane’s length will be their height, and the width will determine how many cladding slats there’s going to be, based upon the individual width of each slat and some notional joint space in between each slat.
I’m making some assumptions here with the cladding – I’m opting for an ‘open rain screen’ system, where there are small gaps in between each cladding slat. I’m also assuming that the cladding is vertical in orientation, and each slat is a simple box, with a predetermined thickness, say half an inch or 1.2 cm.
Don’t worry too much about this for now, this is a blog about creating geometry with MaxScript and not about the intricacies of timber construction.
Thinking about the cladding slats though, what do we need to create them? We need to create a shopping list for their attributes, and then plug in some values.
We need a notional module for their width (e.g. 10cm or thereabouts, 15cm if they’re nice and chunky).
We need a thickness for them, 1.2cm? 1.8cm? Again, up to you..
We need a height (in actuality the length of the ‘waterproofing’ plane we just created)
We need a number for how many there are going to be (i.e. the width of the plane divided by the module of the cladding slats, rounded up (or down) to a simple whole number).
We need to move these slats to the plane we created, and have them sit proud of it, and move them down so they align with its bottom edge.
What else can we do?
We don’t want to create all this geometry for the cladding, and then have to go back and assign a material to it, so let’s do that as we create them.
We’ll also need a UVW map assigned, assuming we have a nice timber texture in our cladding material. It would be good to play with this too, adding a unique XVW Xform modifier as we go, and assign some random offsets so that each cladding slat looks more individual in appearance.
Finally, let’s bump up the height segments for each slat and add a Twist modifier to each, with a small random value for the twist amount, just so the slats look a bit more handmade and natural, rather than computer generated.
OK. We’ve got a starting point here I think, so let’s create a new empty script (top menu > Scripting > New Script)
First things first, let’s define some settings, or rather the attributes of the cladding we’re going to create, and we’ll do that by defining ‘variables’ in MaxScript.
What’s a variable in MaxScript?
A variable is a handy value that you want to keep for easy recall in MaxScript.
It can be anything, a number, a colour, a piece of text, something’s position or rotation – anything you want really. It can be an object too, a newly created box.. And importantly for us, it can be the result of a calculation, multiplying something together, taking away one number from another, you get the idea..
You can define them anytime, you just need to think of a unique name and then obviously the value you want to recall. Here’s a pertinent example based on the cladding slats we’re going to create –
CladdingModule = 15.0
Think of it this way:
‘Memorable name’ ‘=’ (i.e. is going to be set to whatever comes next) ‘the value I want MaxScript to remember so I can use it later’
Try it in the MaxScript listener, type
CladdingModule = 15.0
And hit enter. You should get this –
CladdingModule = 15.0
15.0
Awesome. If you then typed in CladdingModule into the listener and hit return, the listener will reply with its value, 15.0
Don’t put spaces in your variable names, otherwise you’ll get an error message or possibly create two of the same!
Why the decimal place though? There are two types of numbers MaxScript uses, simple ‘counting’ or whole numbers, 1, 2, 3, 4, 5 etc. MaxScript labels these as integers.
And then numbers with decimal places, 1.1, 123.456, 3.1415926535 – they are labelled as floats.
Think of it this way, we can’t have 10.234 cladding slats, but we can have 10, but their width could be 15cm or indeed 15.0cm or 14.9567cm.
When we define CladdingModule = 15.0, we are telling MaxScript that the CladdingModule number 15.0, is a float, and so has decimal places. Also when we divide something using that number (for example the plane’s overall width which we are basing our individual cladding slat’s width on), the answer we’ll get will have decimal places, which is actually what we want for the actual cladding slat’s width. We’re going to actually create slats that have a width close to the desired 15.0cm in actuality, which will become apparent later on.
Information overload I know, but it is important to what we’re going to be doing.
CladdingModule = 15.0, what else did we say?
CladdingThickness = 1.2 (this will actually be the length of the 3ds Max box geometry we’ll create, approximately half an inch in old money).
Remember MaxScript uses the system units, which in my case is centimetres.
What else do we need to define when creating a box in 3ds Max? We’re missing the width and height, but we’re going to calculate (yep, calculate!) values for those from the plane geometry we’re working with.
We need a name ideally, otherwise we’ll end up with box055, box056 etc.
CladdingSlatName = “claddingSlat”
This will be the prefix of the name when we create the cladding slats, and we’ll be using the uniquename feature of MaxScript as we go, which is MaxScript’s way of saying to itself ‘well, we’ve already got 34 cladding slats, so this new one I’m gonna name claddingSlat035’.
Notice the quotation marks too.
Again this is how you define what type of variable is coming after the equals sign, just the same as when we included the decimal point when defining the CladdingModule variable, but in this case we’re telling MaxScript that CladdingSlatName is going to be letters, characters, a word, a name, text or to give the proper MaxScript definition, for those that are interested, a string. A string of characters.
As mentioned at the top of this post, I hopefully explained all this here
Okey dokey, last thing I think was a material for the cladding slats.
Now, you can create a nice new material using MaxScript. You can in fact create any 3ds Max-y thing with MaxScript, cameras, points, helpers, lights, teapots.
In this case, we’re not going to create a fresh new cladding material everytime we run this script though. Why? Because we’ll end up with copies and copies of the same material, each freshly generated everytime we run the script – they will have the same name, but they will be copies of the same thing. Not the best thing, scene wise.
Before using this script, I will have merged in a cladding slat from a previous project. Or, created a quick material and assigned it to an object I already have in the scene. It’s a work-around I know, but it does make things a lot more straightforward.
You can get MaxScript to look through what scene materials you have, and assign this material to new things you’re creating, and here is the syntax, I’m going to assign it to a variable for easy recall when the script runs –
claddingMaterial = sceneMaterials[“timberCladding”]
This sets the variable or link if you like, to our preferred material.
Don’t overthink this (but do get the spelling right!). You’re letting MaxScript know that when you refer to claddingMaterial you mean out of the list of current sceneMaterials ([…] means list), it’s the material called/named timberCladding (hence the “”, it’s a name, therefore a string remember..?).
My variable names are long, I know – I’m trying to explain this all in plain English and trying to avoid using acronyms, but if you’re not a fan of typing, you can abbreviate your variable names, cMod instead of claddingModule, cMat instead of claddingMaterial etc.
Important thing to note though, you can’t mix your variable names with those that 3ds Max ‘keeps’ for itself. You can’t create your own variables and call them camera or x or y or even t (time) – these are reserved by 3ds Max, and it will force an error if you try to use them.
I’ve forgotten the UVW mapping!
Actually, this is an awesome feature of MaxScript, you can create and pre-define ‘empty’ modifiers, such as UVWmap, Bend, Twist and so on. You can’t do this using 3ds Max, working in the viewport. You’d have to create some geometry first, have it selected and then reach over to the right and assign a modifier and then play with its settings.
My cladding timber material has a diffuse bitmap, unsurprisingly called ‘larch.tif’ and it works fine with a UVW box mapping of 300cm.
As well as the other variables I’m creating, I’m going to set this UVW mapping up too, then, as with the material and thickness and other parameters, I can add this modifier to each slat as we go along, using this syntax below to create the UVWmap modifier, which I’ll explain line by line –
claddingUVWmap = UVWMap()
This ‘creates’ the UVWmap modifier but you haven’t added it to any geometry yet or changed any default settings, (you need the two brackets at the end, this lets MaxScript know you mean a UVWmap modifier and not some random imaginary entity UVWmap..)
Now it’s defined, we can alter it to taste..
claddingUVWmap.maptype = 4
Wait, what?
We wanted simple box mapping right? Not plane mapping, or shrink wrap mapping (whatever that is).
Box mapping is maptype 4, the first mapping type, plane mapping is actually 0, not 1 (counterintuitively!) Box mapping, if you look at an existing UVW map modifier is 5th down the list, but starting at 0 that would be 0,1,2,3,4… I know, I know.. They don’t make it easy sometimes..
What else do we need? The length, width and height of the box mapping. Ok, easy enough –
claddingUVWmap.length = 300.0 (float number with decimal point..)
claddingUVWmap.width = 300.0
claddingUVWmap.height = 300.0
OK, here’s all that together in one paragraph –
claddingUVWmap = UVWMap()
claddingUVWmap.maptype = 4
claddingUVWmap.length = 300.0
claddingUVWmap.width = 300.0
claddingUVWmap.height = 300.0
(Feel free to swap the name claddingUVWmap to something a bit more pithy like, I dunno, cUVW or Dave).
Dave = UVWMap()
Dave.length = 300
etc.
The other two modifiers I mentioned, UVWxform and Twist. I won’t pre-define these, we’ll add these later as we create the cladding slats, as these will be individual to each cladding slat. The UVWmap is always going to be a 300cm box for each slat, so no point in re-inventing the wheel on that..
Think that’s it for pre-defining stuff for each slat. And we’ve not even created anything yet!
Sorry. One more thing, and this is a bit abstract and ‘computer-programme-y’. Sorry.
It would be a good idea to somehow keep track of these cladding slats we’re going to create. Keep track of them in a list, so we can then go through the list and do more stuff to each one in turn.
Maybe it would be simpler to create them first, get them in the right place and orientation and so forth. Then, when we’ve done that, maybe that’s the time to add randomised UVWxform and twist modifiers. I think that would be neater and easier to understand.
We could create an empty list to start with (probably right at the top of the script), and then add each newly created slat to the list as we go, further down the script.
And how do we do that?
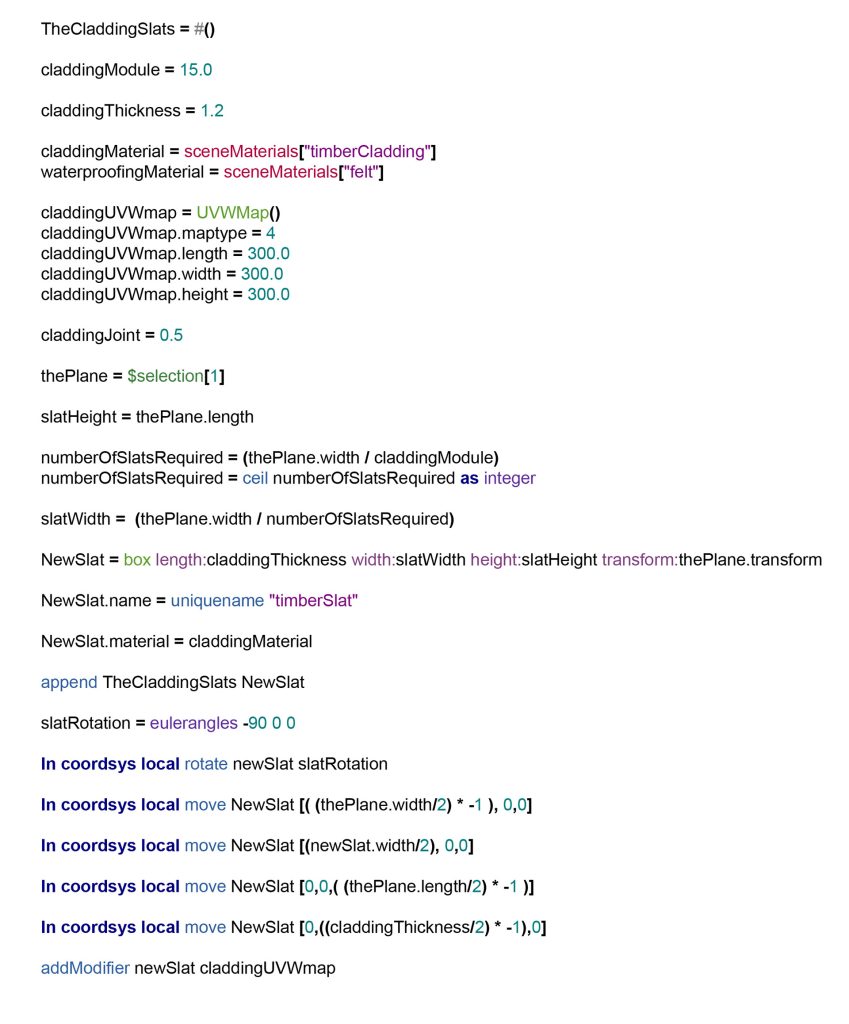
TheCladdingSlats = #()
That does look computer-programme-y, right?
#() is an empty list, or rather an empty array. Lists as we think of them, are arrays in MaxScript.
Here’s a not empty one –
listOfBoxes = #($Box001, $Box002)
You’ve made two boxes in 3ds Max, you’ve typed the above into the MaxScript listener and hit enter..
#($Editable_Mesh:Box001 @ [6.956596,-8.896605,0.000000], $Box:Box002 @ [-76.617371,-20.168291,0.000000])
Those are my boxes, and it’s showing me their positions (why? Dunno). Because we included the dollar signs before the name, MaxScript knows we mean the actual boxes, the geometry, not just some word ‘box001’.
Great, but so what?
listOfBoxes[2].height = 600.0
I’ve just changed the second item of listOfboxes in that I made its height 600.0
Think of it this way –
anArray[number in the list, of the thing you want to play around with]
Don’t ask me why the round brackets had to change to square ones though, it’s just the syntax, and that’s how it is.
OK, going back to our empty list, how do I populate this with each cladding slat as we go?
You append to the list, you add your freshly created slat to it. There’s nothing in it to start with of course, but that doesn’t matter, it will go from a list of nothing, to a list with one item in it, the first slat we make.
Again don’t overthink this. If we make an empty list everytime we run the script, it will overwrite any previous lists, or arrays and start from scratch. We won’t change or add modifiers to the slats we made when we previously ran the script.
It’s probably worth standing back now, and coming up with an overall plan of action. I’ve discussed setting up the initial variables, or parameters if you like.
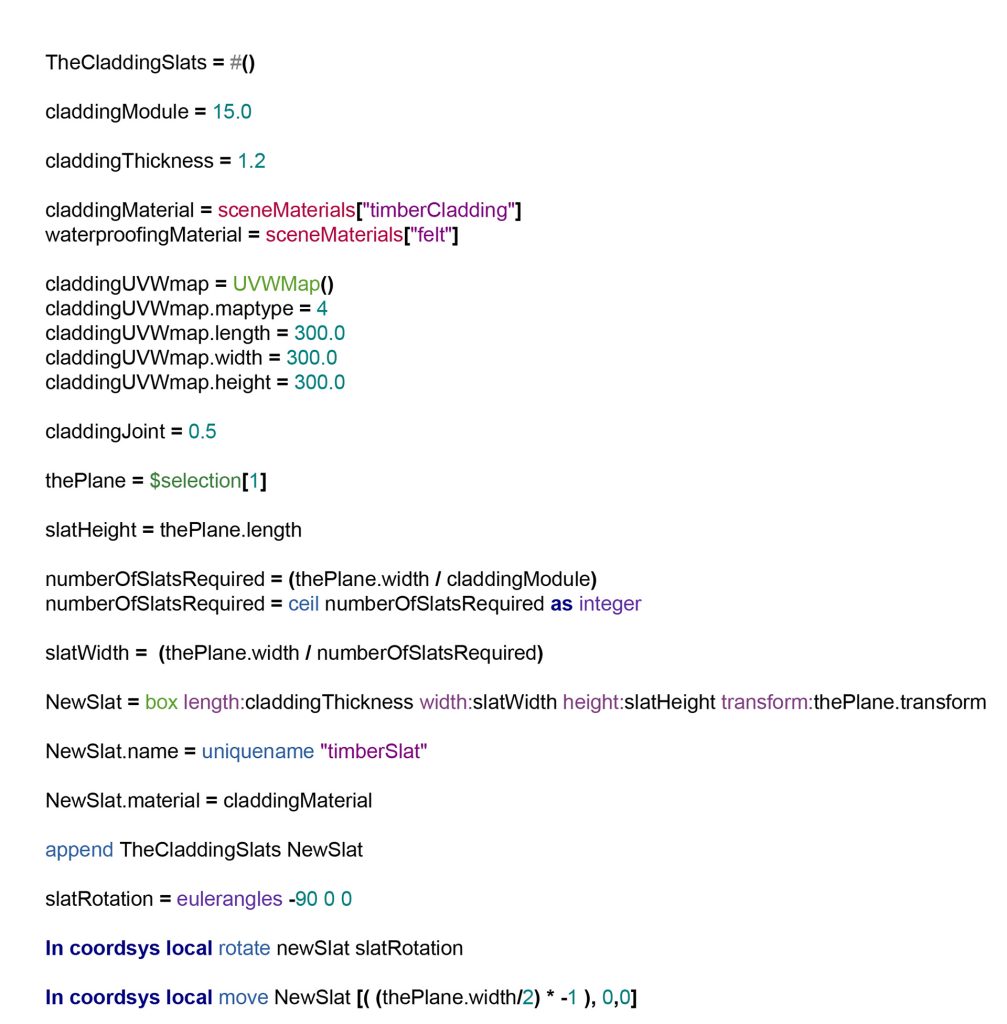
Here’s my list of variables, I’ve put a blank line in between (don’t worry, MaxScript will skip past these). I’ve also added a variable for the joint space in between each slat and while we’re here, a material for the ‘waterproofing’ plane, because why not? We can add that to our plane when we run our script –
TheCladdingSlats = #()
claddingModule = 15.0
claddingThickness = 1.2
claddingMaterial = sceneMaterials[“timberCladding”]
waterproofingMaterial = sceneMaterials[“felt”]
claddingUVWmap = UVWMap()
claddingUVWmap.maptype = 4
claddingUVWmap.length = 300.0
claddingUVWmap.width = 300.0
claddingUVWmap.height = 300.0
claddingJoint = 0.5
OK, so that’s the known knowns if you like, what about the unknowns? What’s the plan?
We’ve set up some initial variables (the known knowns!)
We’ve already got our waterproofing plane selected.
We’re going to figure out (or rather MaxScript is) how many times 15.0 goes into the plane’s width, and then round that down to a whole number (if we’re ok with the slat’s width being slightly over 15.0) or up to the next whole number (if we’re ok with the slat’s width being slightly under 15.0).
I’ll go for the latter, have the slat’s width under 15.0, that’ll be fine. The slat’s height will be the length of our selected plane. Why? Well, the plane which I added using autogrid and in a 3d view, is on its side, with its width running along the ground, but its length is running up vertically, same as if you’d created it in a front, left or right viewport, hopefully this makes sense?
When creating geometry using MaxScript, unless you state otherwise, it will create it with its pivot point at [0,0,0]. That’s ok, we could move the slat to the plane’s pivot point and orientation afterwards.
As our plane will be oriented on its side, we’ll need to rotate our slat so it’s not sticking out perpendicularly to our plane, but so that it’s parallel to our plane, or oriented to the world if you like. We’ll then need to slide it over to the left in its local coordinates, and down to match the bottom corner of our plane. We’ll also need to have it shift outwards slightly, so that it’s sitting proud of the plane. We can then copy the slat over to the right, however many times needed to cover the full width of the plane.
As we’ve been adding to our empty list of cladding slats as we go, we can then easily iterate through this list of slats, adding the material, UVWmap and other modifiers.
So I guess we’ve got three stages
Stage one (already written) – define our initial parameters.
Stage two – generate the right number of slats, with a width close enough to our original module of 15cm and move them into place.
Stage three – add materials, UVWmaps and other slightly randomised modifiers. We’ll also take off the nominal joint width off each slat at the end.
OK, well done for making it thus far!
It’s been an awful lot to cover, but essentially most of the bigger concepts are done, that is except, moving and copying stuff around, and I’m afraid there is a bit of maths to come, but it’s easy maths. Dividing and taking-away maths. Elementary sums.
Remember arrays? Well, what you have selected, $selection, is an array, and $selection[1] is the first thing in that list, our waterproofing plane.
I’m actually going to assign a variable to that. Why? So I don’t have to keep typing $selection[1], and we’ll forget what that refers to. Using ‘ThePlane’ will be more obvious as we go along.
thePlane = $selection[1]
So first things first, the height of the first cladding slat would be thePlane.length as mentioned up above.
The thickness of our slat is actually the slat’s length (we’re making a box with three dimensions right..?) and that we’ve set to be claddingThickness, which we set to 1.2 (cm)
The width though?
Well, we need to find how many times the claddingModule goes into thePlane’s width, and round that up to the next whole number. That gives us how many slats are needed.
We then need to divide the plane’s width by this rounded up number, and that will give us the actual width of the slat to however many decimal places MaxScript throws back at us. Later on, we’ll reduce this slightly by our joint width, but we’ll worry about that later.
Let’s make some new variables, slatHeight, slatWidth (maybe we should have called claddingThickness slatThickness thinking about it, but no matter).
So, slatHeight = thePlane.length
The number of slats we need is the width of the plane divided by the ideal width of the slats, i.e. the cladding module, which we set to 15 cm.
numberOfSlatsRequired = (thePlane.width / claddingModule)
Yep, you can do maths as you go! This will calculate what’s on the right of the equals sign and set numberOfSlatsRequired to the result. Cool, huh? This is creating and setting a variable to the result of a calculation as mentioned earlier.
But, we need to change this to be a number rounded up to the next whole number, and with no decimal places (we can’t have 16.132 slats, it would have to be 17), so how do we do that?
MaxScript has loads of built-in Maths functions. Sin, cos, tan, sqrt (square root). If you type pi into the listener and hit return, it will reply with 3.14159.
There are ‘rounding up’ functions too, floor and ceil. Floor will ‘round down’ to the lower whole number, and ceil will ‘round up’ to the higher whole number, which is the one we want.
These are examples with me typing into the MaxScript listener –
floor 16.9
16.0
ceil 16.1
17.0
Notice the answers have decimal numbers though, perversely. This isn’t quite what we want, we want 17 cladding slats, not 17.0 cladding slats, and so we need to convert the answer to an integer (whole number, no decimal places) rather than a float (number with decimal places).
We can do that by forcing MaxScript to give us an answer in the format we’d like, in this case an integer, a simple whole, counting number –
ceil 16.1 as integer
17
OK, good. Here we are so far, remember we still haven’t created our first slat yet, but we have the dimensions we need –
slatHeight = thePlane.length
claddingThickness (really, really should have called this slatThickness at the start)
numberOfSlatsRequired = (thePlane.width / claddingModule)
numberOfSlatsRequired = ceil numberOfSlatsRequired as integer
Having the same variable name twice in that last sentence may be confusing?
MaxScript works through the script downwards, line by line, like you would read a book.
In the last sentence, we’re taking the answer we got for numberOfSlatsRequired (from the line immediately above) and reformatting it by rounding it up, and getting the answer we want as an integer. Remember you can reset and overwrite your initial variables anytime you want.
Another example below might make this concept easier to understand –
Var = 7
Ok, we’ve created a variable and set it to 7 initially
Var = Var + 1
What’s the current value of Var now? 8. Essentially we’ve overwritten the initial value of Var, from 7 to 8, by adding 1 to it.
Let’s make a cladding slat!
Creating geometry with MaxScript is actually straightforward, if you think of the name of a geometric primitive you want to create as a command rather than, well a name.
Try typing box into the listener.
Nothing happens, apart from the listener replying with box.
OK, well you do have to give MaxScript a bit more than that, it’s not that intelligent.
Try this
Box pos:[0,0,0]
$Box:Box001 @ [0.000000,0.000000,0.000000]
Awesome, you’ve made a 25 by 25 by 25cm box (the default size in the absence of any further info from you), positioned at the origin.
pos:[0,0,0] ?
Pos is shorthand for position, and by adding a colon after this and feeding it some coordinates that’s enough information for MaxScript to add a box at the origin.
Note the square brackets, x, y, z format? This is the syntax for defining coordinates in MaxScript.
You could type this and it would be fine, if you’re not into the whole brevity thing –
Box position:[50,0,0]
$Box:Box002 @ [50.000000,0.000000,0.000000]
pos, position, same thing.
That created a second 25 cm cubed box, but this time 50 cm further along the X axis.
Ok, I want a bigger box but a metre up in the Y axis
Box pos:[0,100,0] length:75 width:75 height:75
$Box:Box003 @ [0.000000,100.000000,0.000000]
So yes, you can feed the parameters you want into a geometric primitive when creating it, by demarking them using the syntax ‘parameter : value’.
Ok, that’s all great but let’s crack on with what we actually came for, we want to create our first slat, have it positioned on our plane (it will be at the plane’s pivot point, which is in its centre) with our variables for its dimensions.
Let’s have a quick recap of those –
claddingThickness (yep, we set that to be 1.2cm, ages ago!)
slatHeight (yep, thePlane.length)
slatWidth – ah, we didn’t actually calculate that yet, just the numberOfSlatsRequired, but this is easy enough –
slatWidth = (thePlane.width / numberOfSlatsRequired)
This will have decimal places in the answer, as thePlane.width has decimal places, even though we changed the numberOfSlatsRequired to be a whole number or simple integer.
One more thing. When we create this first slat, we want it sat on the plane (we’ll rotate it to be upright after, using the slat’s local orientation). We might as well do that when we create the slat.
We could use thePlane’s position, but that doesn’t cover its rotation – it could be at a funny angle depending upon the original design of the cabin?
OK, this is another tough concept to get through, but here goes.
Transformational Matrices.
I’m not, thankfully, going to get into discussing matrices in mathematics, my son is studying ‘further maths’ in higher education currently, and I’m not sure he gets them either so what chance do we mere mortals have?
If you’ve ever added some furniture models to a scene in 3ds Max then more likely than not, your 3d model of a swanky chair, shall we say, will have been originally modelled with its pivot point set at 0,0,0 (or [0,0,0] in MaxScript land). It doesn’t stay there of course, you move it and copy it around your dining table, wherever that is, and rotate them slightly, to look more humanly positioned. I doubt you’d scale them though, although you could do if you wanted to, for a laugh.
Behind the scenes, or under the hood, you’ve applied a transformational matrix to each of your chairs, and this matrix is a one stop shop covering the new position, rotation and scale (ok, our chairs have a scale of 1 to 1, but if it was a 3d model of a tree for example, then you might scale it up or down a bit).
This matrix maths is obviously very powerful, but these matrices are not pretty. If a create a new box, and shift it around, rotate it and scale it a bit, and then ask MaxScript to show me what it is, well, you’ll see for yourself –
$box004.transform
(matrix3 [1.48679,-0.904948,0.288731] [0.949893,1.41644,-0.451927] [1.19209e-07,0.536286,1.68084] [105.064,274.411,0])
Nice.
We don’t need to delve too deeply into this, I just need you to understand that a 3ds Max object in a scene has a ‘transformational matrix’, and we can grab it with something like $thatThingOverThere.transform. We can easily replicate our plane’s transform and use it when we create our cladding slat.
Let’s finally, finally create our slat –
NewSlat = box length:claddingThickness width:slatWidth height:slatHeight transform:thePlane.transform
If you’re reading this on a phone, then please bear in mind all of the above is one line, not three.
We have a slat!
It’s sticking out of the middle of our plane, but we do, finally have a slat!
What’s the ‘NewSlat =’ for? That’s our slat!
You can assign variables to be the result of something, like creating our box.
Our new slat will be called something like box017, so we need to change that using the uniquename syntax –
NewSlat.name = uniquename “timberSlat”
Because I assigned the box we created for the slat to a variable NewSlat (upon the act of creation if you will) I can now play around with it, change its name.
We can add its material now if you’d like? We were going to do this later in ‘stage 3’ of our script, but if you wanted to jump the gun, we can do it now –
NewSlat.material = claddingMaterial
We set this up a while back with claddingMaterial = sceneMaterials[“timberCladding”]
We also need to add this newly created box newSlat to our empty list or array of slats.
append TheCladdingSlats NewSlat
This is a counterintuitive syntax maybe but essentially we’re adding (append) to our array (theCladdingSlats) our newly created object (NewSlat).
Here is the script so far. If you’ve been running it as we go (by selecting Tools > Evaluate All in the MaxScript script editor window) then you may well have had all sorts of errors, or even created lots of slats?

The image above is how it should appear in the Script editor.
Before you test run this, remember to select your waterproofing plane, otherwise thePlane = $selection[1] won’t work – you have no $selection[1] currently so MaxScript doesn’t know what you’re on about..
You also need the two materials in the scene of course, timberCladding and felt. (it might try and run or ‘evaluate’ without these possibly).
Every time I test it, I delete the newly created slat and re-select my plane.
Right, so our slat is sticking out of the plane, it’s actually got the same ‘transform’ as the plane, and so the slat’s local Z axis is the same as the plane’s local Z axis, which, as it’s on its side, is facing out to us.
Let’s rotate it next, a quick manual test in the 3ds Max viewport tells me we need to rotate it -90 degrees in its local X axis. This also rotates it around its pivot point. Both the slat and the plane’s pivot points are centred on each object respectively- we’ve created them ‘fresh’ and not mucked about with their pivot points, which is very handy.
slatRotation = eulerangles -90 0 0
Eulerangles? Great. More maths.
Sorry. Rotations in MaxScript can be tricky, it natively uses ‘quaternions’.
I’ve put a wikipedia link to quaternions below, but seriously, don’t look if you are of a gentle persuasion.
It will give you nightmares.
If you did look and understood any of that, my hat goes off to you. It’s beyond me.
As 3d artists we probably understand it better with, for example, rotating objects ‘around the Z axis’ or ‘around the X axis’ ? And so using the eulerangles syntax I’m guessing, would be much more understandable.
The syntax for describing rotation using ‘euler angles’ is simpler.
eulerangles somethingForX SomethingForY SomethingForZ
Most of the time, two of those of numbers, eg X and Y, will be 0
A anticlockwise rotation of 45 degrees around the Z axis in MaxScript would be –
Eulerangles 0 0 45
Similarly a clockwise rotation of 34.236 degrees would be
Eulerangles 0 0 -34.236 (clockwise is negative in 3ds Max)
Let’s not overthink this, let’s rotate our slat 90 degrees clockwise in its local X axis. We do need to tell MaxScript to use the slat’s local axis’ though, not the World coordinates, Grid or whatever else –
In coordsys local rotate newSlat slatRotation
‘In coordsys local’ is the key bit of syntax, shorthand for ‘please use the slat’s local axis and don’t send it flying off into outer space’.

Phew. Our slat is now upright.
Still stuck in the middle of the plane though, so let’s move it to the far left of the plane, and down.
Moving it half the plane width will have its centre aligned with the left edge of the plane, so we do then need to move it back across, half the slat width if this makes sense?
Moving it down to the bottom of the plane is easy, that’s just half the plane’s length.
I’ll type this in 3 lines, I could probably combine all three movements in one line (or one transformation), but for the sake of a bit of extra typing, it will be far easier to understand.
When moving stuff around in MaxScript, you have to supply the distance in all three axis’ even though, more often than not, two of those will be 0, and in the same format as position coordinates i.e. [x,y,z] but the x y x are not coordinates as such, more the relative movement or distance, + for forwards, – for backwards. And we’re doing it in the slat’s local axis, same as the rotation.
Easier to show, rather than explain I think, but let’s figure out how far we’re moving it beforehand.
Step 1 – half the plane’s width, but backwards in local X, so multiplied by -1 (that’ll switch it to be a negative number).
That would be ( (thePlane.width/2) * -1 )
* means ‘multiply by’, you’ve probably realised / means ‘divide by’ by now?
We need to use brackets I’m afraid, not sure MaxScript could cope with
thePlane.width/2 * -1 without any brackets (but feel free to test that out)
You could do it this way
(thePlane.width/-2) but that’s possibly a bit confusing at first glance. I’m a big fan of keeping things simple to understand.
Step 2 – forwards in X half the slat width – easy enough (newSlat.width/2), this will be positive, i.e forwards!
Step 3 – down half the plane length in the local Z axis.
( (thePlane.length/2) * -1 )
This is probably making everyone’s head hurt right now, so I’ll type it out.
Remember the [x,y,z] syntax, you need a number for each, and the ‘in coordsys local’ bit.
And don’t forget to open and close brackets where needed.. You’ll need your BIDMAS from high school..
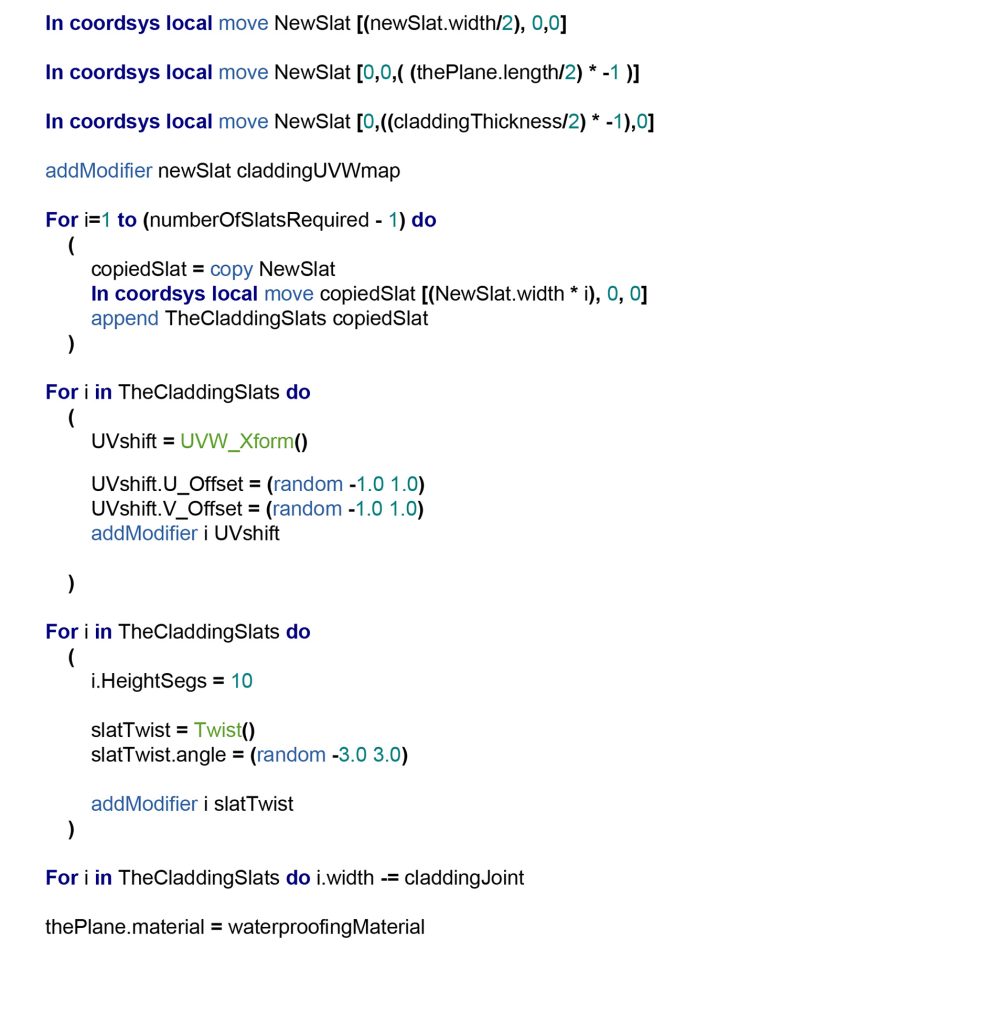
In coordsys local move NewSlat [( (thePlane.width/2) * -1 ), 0,0]
In coordsys local move NewSlat [(newSlat.width/2), 0,0]
In coordsys local move NewSlat [0,0,( (thePlane.length/2) * -1 )]
I’m glad that’s all done with!
I missed one thing out, the slat is still centred on the plane, thickness wise? It still needs to move negative 6mm out (half the cladding slat thickness) in the slat’s local Y axis, so its back face is aligned with the front face of the plane.
In coordsys local move NewSlat [0,((claddingThickness/2) * -1),0]
Note that I didn’t type 1.2/2 (i.e 6mm) instead of (claddingThickness/2).
CladdingThickness we set at the start, if we wanted thicker cladding (and therefore have to move it out more), our script would work that out for us on the fly.
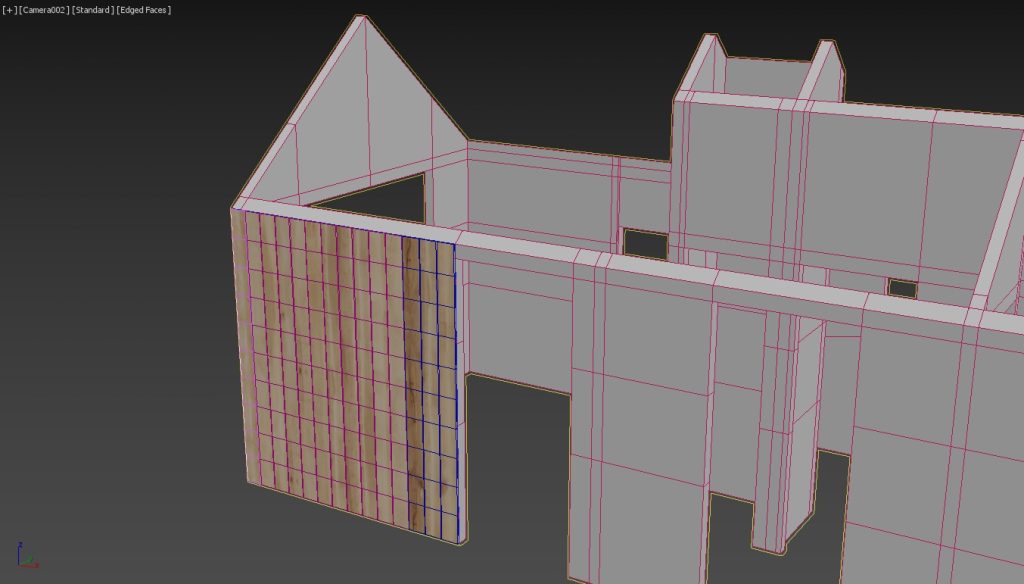
All done, all that for one slat, in the right place, ready to be copied over and messed about with using modifiers.
And for that we’ll need to use a loop.
Looping in 3ds Max
This is the last big concept to get across I think, using loops in MaxScript. Very powerful.
It’s been a very long blog post I know, but there was a lot to introduce and cover. Creating variables, calculating stuff on the fly and assigning that to other variables, overwriting variables, making geometry, using scene materials, creating empty modifiers and adding them to objects.
Hang on!
I’ve forgotten the UVW mapping!
Probably a good idea to do that now before copying them over to the right, to cover our plane.
That’s not strictly true, we could always loop through our list of cladding slats after and add the UVWmap modifier at a later stage, but let me show you how to add the UVWmap modifier we created earlier now. We will be looping through the list of cladding slats later though and adding the Twist and UVWxform modifiers.
The syntax isn’t too bad, it’s a lot like the ‘append list object’ one from earlier –
addModifier newSlat claddingUVWmap
I.e. addModifier ‘the geometry’ ‘the modifier you made, using the name you called it’
(I didn’t rename my UVWmap modifier ‘Dave’ btw, that was just my little joke).
It doesn’t matter that we’ve moved our slat around, it will still add it based around the slat’s pivot point.
Before getting into copying our slat across, here’s our script so far –
If you have your waterproofing plane selected, you can run it (evaluate all) and it will create a slat, rotate it, move over the left bottom of the plane and add the timber cladding material, and the UVWmap.
If you are copying parts of this script straight from here, and pasting it into an empty ‘New Script’ window, just double check the quotation marks are the right ones, I had to change mine as I’m typing this in Google Docs and MaxScript can be fussy about stuff like that. You’ll know you have the correct quotations marks as your string if text will go purple like in the image above.
If you do run it (and it works!) remember to delete the new cladding slat and re-select the plane for next time.
Back to looping.
Total MaxScript Awesome Sauce
I introduced looping in my earlier blog post here
And hopefully got across the idea of iterating through objects in a list and doing the same thing(s) to them, one by one. What this will be in this case, will be copying a slat and shunting it across a distance, the slat width (or a multiple of, we’ll come to that).
So, we do know from earlier how many slats we need in total, we calculated the numberOfSlatsRequired to cover the total width of our plane, and we converted it to an integer, a simple whole number.
Actually, there is a slight complication, the number of copied slats we need is 1 less, we’ve already made our first one don’t forget.
There will be lots of ways to do this using MaxScript but I’ll opt for the simplest, although it may appear a bit abstract at first.
There is a ‘copy’ command in MaxScript, if we copied our slat once, then our new one would be in the same place as the original one (we haven’t moved it, just made a copy), we’d then have to shift it over an amount (the slat width) to the right. What about if we did it again? It will still initially be in the same place as our very first, so we’d have to move it over twice the slat width, to leapfrog past the other copy we made. The third copy will need to scoot over three times the slat width. I’m describing the looping process verbally! We’d have to stop doing this at some point though, as it’ll go on forever if we’re not careful.
So for the looping procedure, we need a start point and definitely some way of stopping it.
We need some sort of counter that starts at 1 and ends up at the total number of slats required. Actually, not quite, starts at 1, ends at (numberOfSlatsRequired – 1).
OK. This is again going to look very computer-programme-y, but here’s the syntax for a loop
For i=1 to 17 do
(
Stuff
And more stuff
And even more stuff
)
Wowzers! What on earth is that all about?
Hard to explain in words, but here goes. This is a loop that is going to run 17 times (I picked 17 randomly, it could be 2489, any number you like). The stuff in the brackets, maybe that’s more easy to understand, that’s all the stuff that will happen (‘run’ or ‘execute’), line by line, 17 times and then the loop will stop.
The i=1 bit though?
Ok, I mentioned that we needed a ‘counter that starts at 1’ and this is that, or rather I’ve invented a quick variable ‘i’ (that’s its name). It could be ‘counter’ or ‘ticker’ or ‘Daphne’ I guess. It doesn’t matter what you call it, as long as it’s not one of those variable names MaxScript keeps for itself, like x or t or camera or currentFileName for example.
Maybe this looks better –
For counter=1 to 17 do
(
Stuff
And more stuff
And even more stuff
)
I’ll switch back to i as I’m lazy typing-wise, and I know ‘i’ isn’t one of those reserved variable names (please don’t phone in, complaining and say ‘but i is the square root of -1’).
Let me do an actual loop that will work if you typed it into the MaxScript Listener. Inside the brackets bit I just put one command for the ‘stuff to get done’ –
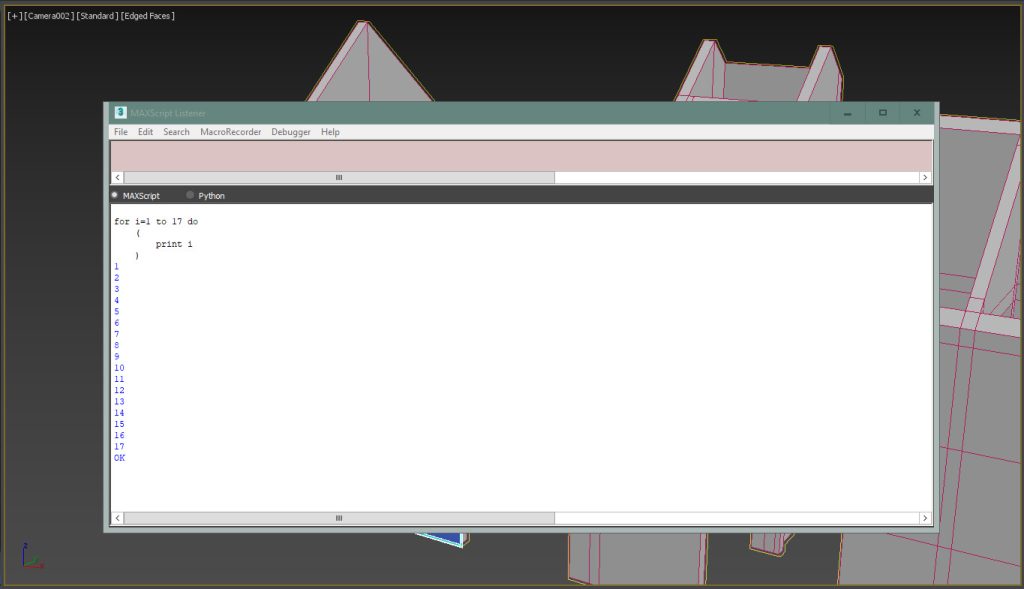
The ‘print i’ bit, that’s just a MaxScript command to report back what the value of ‘i’ is currently. And as you can see, as the loop runs, it grows by 1 every time.
Think of it this way, the first time the loop runs, i = 1, the second time i becomes 2, the third time, i becomes 3 and so on, until the 17th time, i becomes 17 and then the loop stops.
This is all very abstract I know, but again don’t overthink it. The loop does need to end at some point, and that’s the ‘to 17’ bit.
Let’s relate it back to what we’re doing, copying the first slat over to the right, a number of times or rather (numberOfSlatsRequired – 1) times, as remember we’ve already got our first slat.
For i=1 to (numberOfSlatsRequired – 1) do
(
stuff
)
What stuff?
We’ll assign (and reassign / overwrite every time the loop runs) our copied newSlat to a new variable copiedSlat and then move this copiedSlat over in its local X by its width multiplied by whatever ‘i’ is (1,2,3,4,5..) as the loop runs, and then the loop will finish when we or rather i matches (numberOfSlatsRequired – 1).
Also, we need to append our newly copied slat to our list, or array, of slats as we go.
Why? Well, we can use that as a basis of another loop or loops, where we’ll add UVWxform, Twist modifiers, and take away the joint width.
Back to our copying slats over loop –
For i=1 to (numberOfSlatsRequired – 1) do
(
copiedSlat = copy NewSlat
In coordsys local move copiedSlat [(NewSlat.width * i), 0, 0]
append TheCladdingSlats copiedSlat
)
With the ‘move the copied slat over to the right bit’ –
In coordsys local move copiedSlat [(NewSlat.width * i), 0, 0]
I included * i in there, i.e. move the copied slat the slat width times 1, times 2, times however many we need.
Bingo!
We’ve covered our waterproofing plane with a lovely bunch of nice, neat and regular cladding slats.
With this bit, copiedSlat = copy NewSlat, you could swap ‘copy’ for ‘instance’, which is MaxScript’s command for creating instanced Geometry rather than just copies, but we don’t want to do this in this case, as we will adding unique UVWxform and Twist modifiers next, with another loop, or loops.
We could do this in one big fat loop, with loads of ‘do this stuff’ inside the loop brackets, or we could type three loops instead? One for creating from scratch, and then adding the randomised XVWxform modifier, one for creating, adding the Twist modifier, and then a simple final loop for taking away the joint width?
We’re done with creating cladding slat boxes now, and we have our list / array of created slats, which we can refer to from here on in.
Looping through an array list is simpler than all that ‘i=1 to 17’ business in actuality.
MaxScript gets that if you say ‘for i in array’, the variable i will temporarily be swapped for each item in the list, one by one, until the end of the list.
For example –
For i in TheCladdingSlats do
(
print i.name
)
This will just iterate through the array and list the name of each item, which give you something like
“timberslat001”
“timberslat002”
“timberslat003”
Etc
Let’s go with three loops, the first was to create and add an UVWxform modifier and then randomise its offsets.
Generating random numbers in MaxScript is easy, and one of its most useful characteristics, I find.
aRandomNumber = random 1 10
5
aRandomNumber = random 1 10
8
aRandomNumber = random 1 10
9
Hopefully you’re getting the general syntax of MaxScript by now?
The syntax for generating a random number in MaxScript needs a range, like for example 1 to 10 shown above. The above is using integer whole numbers though, in a short range. This is a bit boring.
Try this –
aRandomNumber = random 0.000 100000.000
1846.76
aRandomNumber = random 0.000 100000.000
34505.2
That’s more like it!
The U and V offsets of an UVWxform modifier only need to go between -1.0 to 1.0, so we’ll use that, and not get carried away too much. When we set them as well, we’ll need to use brackets otherwise we’ll cause an error. U_Offset wants one answer, not three things ‘random’, ‘-1.0’, ‘1.0’
UVWxform.U_Offset = (random -1.0 1.0)
OK, let’s write the loop for this
For i in TheCladdingSlats do
(
UVshift = UVW_Xform()
UVshift.U_Offset = (random -1.0 1.0)
UVshift.V_Offset = (random -1.0 1.0)
addModifier i UVshift
)
Every iteration of this loop creates a new UVWxform modifier from scratch, messes about with its U and V offsets (don’t bother with W), and then adds it to i or rather, each member of theCladdingSlats, which i is temporarily standing-in for, one by one. You can mess about with the modifier’s settings before you even add it to some Geometry. It stops looping when it reaches the end of the list / array.
Not much more to do now, believe it or not!
The loop to add the Twist modifier will be similar to the one above. Although we do need to introduce some more height segments (or HeightSegs) to our slats, otherwise our Twist will be a bit clumsy looking. It’s ok to increase the original box for each slat’s height segments, even though it has a UVWmap and UVWxform modifier sat over the top, MaxScript will ‘know’ you are referring to its underlying Box primitive geometry.
For i in TheCladdingSlats do
(
i.HeightSegs = 10
slatTwist = Twist()
slatTwist.angle = (random -3.0 3.0)
addModifier i slatTwist
)
With the ‘i.HeightSegs = 10’ bit, remember, i is standing-in for each member of our TheCladdingSlats, each slat created by this script earlier on.
I chose 10 for the number of height segments, but you could write a bit of extra MaxScript. You could divide the slat height by something like 30cm, round that answer up or down, and convert it to an integer. You can’t have 11.245 height segments, after all, just 11. Maybe that could be some homework for you..
A Twist modifier has a parameter ‘angle’. OK, maybe using a random value from -3.0 to 3.0 is a bit too strong and rustic looking, so feel free to swap that for -1.0 to 1.0, for example.
Onto the last bit, subtracting the joint width. I decided to leave this to the end. Why? Remember we were copying our slats across, based on their width. If we’d subtracted the joint width before doing that, then our slats wouldn’t have copied across enough to fill our waterproofing plane.
If you recall this from earlier where we increased a variable by 1 –
Var = 7
Var = Var + 1
Var has now been overwritten to be 8
So subtracting the joint amount from the slat width should appear pretty straightforward?
We set a number for our ‘claddingJoint’ of choice early on with ‘claddingJoint = 0.5’
For i in TheCladdingSlats do
(
i.width = i.width – claddingJoint
)
For those reading this who are a bit more familiar with coding, you’ll probably guess there is a simpler, (although more cryptic visually) way of typing the above in a way that MaxScript will still understand and execute.
Going back to this,
Var = 7
Var = Var + 1
The above can be combined into one single shorter line –
Var += 1
Essentially Var is ‘adding one more to itself’
Subtraction, same but different –
Var -= 1
Not helped visually maybe, with – looking a bit like =
Var *= 3, would multiply the initial value of Var by 3, you get the idea?
So our ‘taking away the joint width’ loop could be rewritten like so –
For i in TheCladdingSlats do
(
i.width -= claddingJoint
)
Either version of the loop is fine.
With just having a single line in the ‘do this stuff’ bit of this simpler loop, you don’t actually need the brackets. You could type this instead –
For i in TheCladdingSlats do i.width -= claddingJoint
I always do use brackets though. I probably ‘overuse’ brackets, but to me, it looks more legible and makes it easier to understand what’s going on within a script.
One very last thing. We didn’t add the felt material to our plane.
You can add the below in anywhere after thePlane = $selection[1] –
thePlane.material = waterproofingMaterial
Don’t stick this in the middle of a loop though, you only need to do this one thing once!
And that, my friends, is it!
Here is our script –
It’s been a very long and long-winded blog post!
But I’ve explained a great deal of MaxScript hopefully, possibly all the MaxScript you’d ever want or use in ArchViz.
I write a lot of these. I don’t make them all fancy with a UI with spinners, checkboxes and buttons and so forth. I just stick to plain text.
But generally, if I find I have to model something repetitive, or something where I think I’ll need to have a calculator at hand, then I will spend an hour writing a script instead. The beauty is, you can save and copy them, tweak the initial settings, you could change it be for something like 4 foot plywood panels for example, floorboards (staggering these would require a bit more tricky scripting though, I’m guessing), pantiles on roofs. Anything you like.
You could also take bits of the script and make other useful tools. You now know how to create a 300cm Box UVWmap modifier for example..
Why not also make a 450cm one for brickwork?